Placeholder Content Image

Lemon curd and cream sponge cake

<p>Not only is this cake beautiful, but homemade lemon curd and cream sandwiched between lovely sponge cakes, it will exceed all expectations.</p> <p><strong><span style="text-decoration: underline;">Serves:</span> </strong>12</p> <p><strong><span style="text-decoration: underline;">Ingredients:</span></strong></p> <ul> <li>350g butter, softened, plus extra for greasing <ul> <li>350g caster sugar</li> <li>4 lemons, zest only, plus juice of 2 lemons</li> <li>3 large pieces candied lemon peel, finely chopped</li> <li>6 free-range eggs</li> <li>3 teaspoon baking powder</li> <li>300g self-raising flour</li> <li>50g cornflour</li> </ul> </li> </ul> <p><em>Lemon curd</em></p> <ul> <li>60g butter</li> <li>225g caster sugar</li> <li>3 lemons, juice and zest</li> <li>2 free-range eggs</li> </ul> <p><em>Cream</em></p> <ul> <li>300ml double cream</li> <li>200g icing sugar, sifted, plus extra for dusting</li> </ul> <p><strong><span style="text-decoration: underline;">Method:</span></strong></p> <p>1. Preheat the oven to 180°C. Grease and line two cake tins.</p> <p>2. In a bowl, cream the butter and sugar until pale and fluffy. Add the lemon zest and juice and candied peel.</p> <p>3. Slowly beat in the eggs, one at a time, until the mixture is well combined.</p> <p>4. Sift the baking powder, self-raising flour and corn flour together in a bowl and fold into the cake mixture.</p> <p>5. Divide the cake mixture evenly between the two cake tins and bake for 25 to 30 minutes or until risen and golden-brown. Remove from the oven and set aside to cool for 10 minutes. Run a round-bladed knife around the inside edge of the tins to loosen the cakes. Remove the cakes from the tins and set aside to cool completely on a rack.</p> <p>6. Meanwhile, to make the lemon curd heat the butter, sugar and lemon juice and zest in a bowl set over a pan of simmering water, stirring occasionally until the butter has melted and the sugar has dissolved. Be sure not allow the base of the bowl to touch the surface of the water. Remove from the heat.</p> <p>7. Meanwhile, beat the eggs in a separate bowl. Slowly whisk the melted butter mixture into the beaten eggs until well combined.</p> <p>8. Set the bowl over the pan of simmering water and cook, whisking constantly, for two to three minutes or until the mixture thickens enough to coat the back of a spoon.</p> <p>9. Sieve the lemon curd into a clean bowl, then cover with cling film and set aside to cool.</p> <p>10. For the cream, whip the cream and icing sugar together in a bowl until soft peaks form when the whisk is removed.</p> <p>11. Place one of the cakes onto a serving plate and spread with the lemon curd. Spread over some of the whipped cream and sandwich with another cake. Drizzle the top of cake with lemon curd and let it run over the edges.</p> <p><em>Images: Shutterstock</em></p>

Food & Wine

Placeholder Content Image

From a series of recipes designed by Xali: Baked Barramundi with lemon and assorted greens

<p dir="ltr"><strong>Baked Barramundi with lemon and assorted greens</strong></p> <p dir="ltr">Xali is Australia’s first training, dietary and wellness program to cater to women going through biological changes with a focus on perimenopause and menopause. </p> <p dir="ltr">As women go through menopause they often experince tummy bloating from a change in hormones. Pickled foods are great to help reduce bloating, as fermented foods nourish the lining of your stomach. </p> <p dir="ltr">This recipe was designed by award-winning clinical nutritionist, Samantha Gowing to help woman reduce symptoms of tummy bloating as they are going through menopause.</p> <p dir="ltr"><strong>Prep</strong>: 20 mins</p> <p dir="ltr"><strong>Cook:</strong> 15 mins</p> <p dir="ltr"><strong>Yields:</strong> 1 serve</p> <p dir="ltr"><strong>Ingredients:</strong></p> <p dir="ltr">2 tsp macadamia, olive or peanut oil</p> <p dir="ltr">½ bunch asparagus, trimmed
</p> <p dir="ltr">1 cup spinach</p> <p dir="ltr">½ cup silverbeet</p> <p dir="ltr">200 gram Barramundi, or other white fish</p> <p dir="ltr">Salt</p> <p dir="ltr">Cracked black pepper</p> <p dir="ltr">½ lemon, cut into wedges</p> <p dir="ltr"><strong>Method:</strong></p> <p dir="ltr">1. Preheat the oven to 170 C.</p> <p dir="ltr">2. Line a small baking dish with baking paper.</p> <p dir="ltr">3. Place asparagus, spinach and silverbeet on the baking dish, top with fish and drizzle with oil and season.</p> <p dir="ltr">4. Bake for 15-20 minutes, check fish is cooked through by flaking gently with a fork.</p> <p><span id="docs-internal-guid-2cf9307c-7fff-c5e6-a472-5acce2b6bf11"></span></p> <p dir="ltr">5. Transfer to a serving plate and serve with wedges of fresh lemon.</p> <p dir="ltr"><em>Image: Supplied</em></p>

Food & Wine

Placeholder Content Image

Sweet and tangy lemon and blueberry cheesecake

<p>Time to prepare 1 hr 10 mins |Serves 10</p> <p><strong>Lemon and blueberry cheesecake</strong></p> <p>Bringing together sweet blueberries and tangy lemons, this simple cheesecake is light but luscious. It’s the perfect end to a lazy summer meal!</p> <p><strong>Ingredients </strong></p> <ul> <li>Melted butter, extra, to grease</li> <li>375g cream cheese, at room temperature, cubed (see Tips)</li> <li>3 eggs, at room temperature</li> <li>185g (3/4 cup) sour cream</li> <li>125ml (1/2 cup) thin (pouring) cream</li> <li>165g (3/4 cup) caster (superfine) sugar</li> <li>1 tablespoon finely grated lemon zest</li> <li>2 tablespoons freshly squeezed lemon juice</li> <li>200g fresh or frozen blueberries (see Tips)</li> <li>Icing (confectioners’) sugar, to dust</li> </ul> <p><strong>Biscuit base</strong></p> <ul> <li>100g plain sweet biscuits</li> <li>60g butter, melted</li> </ul> <p><strong>Directions</strong></p> <p>1. Preheat the oven to 150°C. Line the base of a 20cm spring-form cake tin with baking paper. Brush the side of the tin with a little melted butter to grease.</p> <p>2. To make the Biscuit base, process the biscuits in a food processor until finely crushed. Add the butter and process until well combined. Sprinkle the mixture over the base of the tin and use the back of a metal spoon or the base of a glass to press down to cover evenly. Put the tin on a baking tray and place in the fridge.</p> <p>3. Clean the food processor bowl and process the cream cheese until smooth. Add the eggs and process until smooth. Add the sour cream, thin cream, sugar, lemon zest and juice and process until well combined and smooth, scraping down the side and base of the bowl when necessary. Pour into the tin over the base. Scatter the blueberries over the top.</p> <p>4. Bake for 1 hour 10 minutes or until the cheesecake is just set but the centre trembles slightly when the tin is shaken gently. Turn off the oven, use a wooden spoon to keep the oven door ajar and leave the cheesecake in the oven for 1 hour (this helps prevent the cheesecake from cracking). Transfer the cheesecake, still in the tin, to the fridge and chill for at least 3 hours or until well chilled. Dust with icing sugar and serve.</p> <p><strong>Tips</strong></p> <p>Having the cream cheese at room temperature means it will easily become smooth and creamy in the food processor. If you use it straight from the fridge it will take longer and you’ll need to scrape the side and base of the food processor frequently so that no lumps are left after processing.</p> <p>If using frozen blueberries, use them straight from the freezer – do not thaw.</p> <p><strong>Variations</strong></p> <p><strong>Orange &amp; Raspberry Cheesecake</strong> – Replace the lemon zest and juice with orange zest and juice. Replace the blueberries with fresh or frozen raspberries.</p> <p><strong>Blueberry &amp; White Chocolate Cheesecake</strong> – Replace the lemon zest and juice with 1 1/2 teaspoons natural vanilla extract or essence. Melt 180g good-quality white chocolate and cool to room temperature. Add to the bowl of the food processor just before transferring the mixture to the tin and process until just combined.</p> <p><strong>Individual Lemon &amp; Blueberry Cheesecakes</strong> – Line a 12-hole 80ml (1/3 cup) capacity muffin tin with paper cases. Divide the biscuit base, cream cheese mixture and blueberries evenly among the cases. Bake at 160°C for 30 minutes. Cool as per the recipe, then chill in the fridge for at least 1 hour before removing the paper cases and serving.</p> <p>Recipes and images from Bake Class by Anneka Manning ($39.99, Murdoch Books).</p> <p><em>Republished with permission <a href="https://www.wyza.com.au/recipes/lemon-and-blueberry-cheesecake.aspx">of Wyza.com.au.</a></em></p>

Food & Wine

Placeholder Content Image

Mum’s miracle hack for restoring ruined chopping boards

<p>An online Melbourne mum and avid Tik Tok user by the name of <a rel="noopener" href="https://www.tiktok.com/@mama_mila_/video/6862601561869241606" target="_blank">Mama Mila</a> has wowed fans with her amazing hack to bring scratched wooden chopping boards back to life – and it’s so easy you can get it done in just minutes.</p> <p>“This hack is so quick and it's completely chemical-free,” writes Mila. “Just cut a lemon in half and rub the entire board with the juice. Once you've rubbed the board with lemon juice, sprinkle coarse sea salt and rub that in with a cloth.”</p> <p>Leave it for a few moments, and then rinse the board and leave it to dry.</p> <p>“Finally, rub it with mineral oil as this prevents it from absorbing moisture and cracking over time.”  </p> <p><strong>METHOD</strong></p> <ol> <li>Cut a lemon in half and rub the lemon juice into your wooden chopping board.</li> <li>Sprinkle coarse sea salt and rub it in with a microfibre cloth.</li> <li>Leave for a few moments, then rinse the board and leave it to dry.</li> <li>Rub is with a mineral oil to prevent it from absorbing moisture and cracking over time.</li> </ol> <p>Thousands who viewed the quick and easy hack were blown away by just how simple and effective it is, writing “OMG” and “this is fantastic”.</p> <p>“I need this,” another wrote, “my board just cracked.”</p> <p>Others said they would definitely try it for themselves.</p> <p><strong>IMAGES:</strong> Tik Tok / <a rel="noopener" href="https://www.tiktok.com/@mama_mila_/video/6862601561869241606" target="_blank">Mama Mila</a></p>

Home Hints & Tips

Placeholder Content Image

Lemon curd cheesecake eggs

<p>Perfect for wowing your guests - these lemon curd cheesecake eggs are the ideal treat for your next function!</p> <p><strong>Ingredients:</strong></p> <ul> <li>225g cream cheese, at room temperature</li> <li>400g sweetened condensed milk</li> <li>2 teaspoons finely grated lemon zest (from 2 lemons)</li> <li>60ml lemon juice</li> <li>12 hollow white chocolate Easter eggs (6 cm tall), store-bought or homemade (see Tips below)</li> <li>60g lemon curd</li> </ul> <p><strong>Directions:</strong></p> <p>1. Beat the cream cheese using an electric mixer until smooth. Beat in the condensed milk until smooth. Add the lemon zest and juice and beat again until smooth and creamy. Refrigerate for 1 hour.</p> <p>2. Gently knock the top off the Easter eggs to create a small opening, creating a cracked shell effect.</p> <p>3. Place the chilled cheesecake mixture into a piping bag, snip off a 1cm opening and pipe the cheesecake into the eggs to just below the rim. (You will have leftover cheesecake filling; this can be frozen for up to a month.) Refrigerate the eggs for 1 hour.</p> <p>4. Scoop a small well in the centre of each egg with a teaspoon, fill with 1 teaspoon of lemon curd and tap gently on a work surface to help flatten it (to look like the yolk in the centre of the egg).</p> <p><strong>Tips:</strong></p> <p><strong>Make Homemade White Chocolate Easter Eggs</strong></p> <p>Melt 250g of white compound chocolate. Paint a layer into an Easter egg chocolate mould about 6cm tall by 4cm wide. Set in the fridge, then paint a second coat of melted chocolate. Return to the fridge. Remove the eggs from the mould. Heat a small frying pan over a medium heat. Lightly touch the rims of two egg halves onto the hot surface for 3 seconds so they just start to melt, then quickly press the melted edges together. You will need 12 eggs in total.</p> <p><em>Images and recipes from<span> </span><a rel="noopener" href="http://t.dgm-au.com/c/185116/69171/1880?u=http%3A%2F%2Fwww.booktopia.com.au%2Fsweet-celebrations-elise-strachan%2Fprod9781743369197.html" target="_blank"><span>Sweet! Celebrations by Elise Strachan</span></a><span> </span>(Murdoch Books).</em></p> <p><em>Republished with permission of <a rel="noopener" href="https://www.wyza.com.au/recipes/lemon-curd-cheesecake-eggs.aspx" target="_blank">Wyza.com.au</a>. </em></p>

Food & Wine

Placeholder Content Image

Indulge your sweet tooth with lemon polenta cake

<p>Polenta is made from dried corn and is a common staple in Northern Italy where it is served as an alternative to rice or potatoes. Used in cakes, it creates a wonderful dense texture and is perfect for people on a wheat-free diet. This makes quite a large cake which keeps beautifully for several days. I like to serve it warm with ice-cream as a dessert. </p> <p><strong>Time to prepare: </strong>20 minutes</p> <p><strong>Cooking time: </strong>70 minutes</p> <p><strong>Serves: </strong>12</p> <p><strong>Ingredients</strong></p> <div class="article-body"> <ul> <li>450g butter, softened</li> <li>450g sugar</li> <li>6 large eggs</li> <li>Zest and juice of 3 lemons</li> <li>Zest and juice of 1 orange</li> <li>2 teaspoons vanilla extract</li> <li>450g ground almonds</li> <li>300g instant yellow polenta</li> <li>2 teaspoons baking powder</li> <li>Icing sugar, to serve</li> <li>Mascarpone, to serve</li> </ul> <p><strong>Directions</strong></p> <ol> <li>Preheat the oven to 170°C. Grease a 26cm non-stick springform tin. 
</li> <li>Using electric beaters, beat the butter, sugar and zests of lemon and orange together until thick and pale. With the motor running, add the eggs, one at a time and beat well after each addition. 
</li> <li>Fold in the lemon juice, orange juice, vanilla extract, ground almonds, polenta and baking powder. Mix thoroughly so all the ingredients are combined. 
</li> <li>Pour the batter into the prepared tin, tapping gently to make sure there are no air bubbles. 
</li> <li>Bake for 40 minutes, then reduce the heat to 150°C and bake for a further 20–30 minutes. If necessary, cover the cake with foil if it is beginning to brown too quickly.
</li> <li>Remove the cake from the oven and allow to cool in the tin. When cold, remove from the tin.</li> <li>To serve, sprinkle with icing sugar and serve with a dollop of mascarpone mixed with some lemon zest or lemon gelato.</li> </ol> <p><strong>Tips</strong></p> <p>To make baby polenta cakes, halve the recipe and bake in lined muffin cups for 25 minutes, then 15 minutes at the reduced temperature.</p> <p><em>Recipe and image from Bake Your Cake &amp; Eat it Too (New Holland Publishers), RRP $29.99,<span> </span><a rel="noopener" href="http://www.newhollandpublishers.com/" target="_blank"><span>newhollandpublishers.com</span></a>.</em></p> </div> <div class="social-media-column"> <div class="addthis_sharing_toolbox" data-url="https://www.wyza.com.au/recipes/lemon-polenta-cake.aspx" data-title="Lemon Polenta Cake | WYZA" data-description="A common staple in Northern Italy, using polenta in cakes creates a wonderful dense texture and is perfect for people on a wheat-free diet - wyza.com.au"> <div id="atstbx3" class="at-share-tbx-element addthis-smartlayers addthis-animated at4-show" aria-labelledby="at-0d0bd90e-658a-43d4-80a6-1fd1f5aaa696"> <p><em>Written by Wyza. Republished with permission of </em><a href="https://www.wyza.com.au/recipes/lemon-polenta-cake.aspx"><em>Wyza.com.au</em></a><em>.</em></p> </div> </div> </div>

Food & Wine

Placeholder Content Image

Why does lemon juice lighten the colour of tea?

<p><strong>I’ve always wondered what happens when pouring a few drops of lemon juice into a cup of tea (no milk added). Why does it lighten the tea’s colour? – Michel, Paris</strong></p> <p>To answer this question, we need to think about the molecules that give a cup of tea its colour - and how lemon juice affects them.</p> <p>Tea is typically made from the plant <em>Camellia sinensis</em>.</p> <p>It is one of the most consumed beverages (second only to water) globally and is ranked as the <a href="http://www.fao.org/3/a-i4480e.pdf">most consumed manufactured drink</a>. The origins of its consumption were first recorded more than 5,000 years ago, so it is also one of the world’s oldest drinks.</p> <p>Tea has been used for a variety of health conditions in China since ancient times, and it took time (around 1,000 years) to change from being seen as a medicine to today’s “every day drink”. Some of the health benefits of tea are now receiving <a href="https://theconversation.com/health-check-five-reasons-to-put-the-kettle-on-and-have-a-cup-of-tea-42419">renewed attention</a>.</p> <h2>The colour of tea</h2> <p>Today, tea varieties are heavily dependent on the processing techniques after harvest. These include oxidation and fermentation of tea leaves, which change their colour and flavour. Use of these manufacturing techniques provides six distinctive categories of tea, based primarily on colour: green, yellow, dark, white, oolong, and black.</p> <p>Black tea and green tea are often (but not always) obtained from the same plant but their chemical makeup is vastly different.</p> <p>The leaves used for green tea production are heated either by steam, pan frying, roasting or baking immediately after harvesting. This process stops chemical reactions driven by the enzyme polyphenol oxidase that would otherwise oxidise coloured chemicals such as polyphenols (catechins).</p> <p>This results in tea keeping its familiar yellow-green colour. Once the leaves are “fixed” they are soft – and are then rolled and dried to become the product we see on supermarket shelves.</p> <p>The production of black tea depends on the enzymes being allowed to oxidise the catechins completely to form new chemicals – these are pigments (theaflavin and thearubigin) that provide the characteristic dark colour.</p> <p>Although thearubigins are less common in your black teabag (around 10-20% of the dry weight), they are more soluble – so when you make a brew these compounds can account for up to <a href="https://www.sciencedirect.com/science/article/pii/B9780080453828001088">60% of the solids</a> suspended in the solution.</p> <p>In broad terms, all other colour categories of tea fit between green and black. So categorisation of teas based simply on colour mostly depends on the type and amounts of these compounds found in the brewed product.</p> <h2>What happens when lemon juice is added?</h2> <p>The thearubigins in brewed tea are highly coloured (red-brown) molecules that <a href="https://www.sciencedirect.com/science/article/pii/S030881460100108X">change according to the acidity of the liquid used</a>.</p> <p>If the water used for the tea infusion is relatively alkaline (for example, due to limescale found in “hard” water), the colour of the tea will be darker and deeper.</p> <p>However, once an acid such as a slice of lemon or lemon juice is added, tea changes colour because of an increase in acidity (reduction in pH) of the beverage itself. Lemon juice is quite strong as a food acid – a few drops are enough to alter the theaurbigins, resulting in a dramatic change in colour. Interestingly, theaflavins are not that affected by the change in acidity, and still retain their normal dark red colour.</p> <p>In a case of green tea, the addition of lemon juice will also affect the colour through a similar process. This results in a much paler beverage - beyond the level that would occur just by initial tea suspension.</p> <h2>Does lemon juice make your tea healthier?</h2> <p>The beneficial health effects of tea are linked to its total polyphenol content, mainly the catechins. However, one of the problems with these compounds is that they are rather unstable. When alkaline (hard) water is used, they break down relatively quickly (<a href="https://www.sciencedirect.com/science/article/pii/S0308814603000621">within a few minutes of brewing</a>).</p> <p>Even if they do remain in solution, the absorption of these compounds is low (less than 2%), and can also be inhibited by the <a href="http://www.mdpi.com/2076-3921/4/2/373">food consumed with your cuppa</a>.</p> <p>Increasing the acidity of drinks has been shown to improve the stability of catechins in beverages. This is one of the main reasons why drinks such as iced teas tend to be quite acidic. However, to make them more palatable, relatively high levels of sweeteners (mainly sugars) are also added.</p> <p>So, all up, although the key compounds in your cup of tea tend to degrade quickly, the addition of lemon does protect them temporarily from this breakdown. But it’s not a huge effect. Adding lemon can enhance the flavour and enjoyment of tea, and change its colour, but its best not to expect any extra boosts to your health.<!-- Below is The Conversation's page counter tag. Please DO NOT REMOVE. --><img style="border: none !important; box-shadow: none !important; margin: 0 !important; max-height: 1px !important; max-width: 1px !important; min-height: 1px !important; min-width: 1px !important; opacity: 0 !important; outline: none !important; padding: 0 !important; text-shadow: none !important;" src="https://counter.theconversation.com/content/91324/count.gif?distributor=republish-lightbox-basic" alt="The Conversation" width="1" height="1" /><!-- End of code. If you don't see any code above, please get new code from the Advanced tab after you click the republish button. The page counter does not collect any personal data. More info: http://theconversation.com/republishing-guidelines --></p> <p><em>Written by <span>Nenad Naumovski, Asistant Professor in Food Science and Human Nutrition, University of Canberra and Duane Mellor, Senior lecturer, Coventry University</span>. Republished with permission of </em><a rel="noopener" href="https://theconversation.com/ive-always-wondered-why-does-lemon-juice-lighten-the-colour-of-tea-91324" target="_blank"><em>The Conversation</em></a><em>. </em></p>

Food & Wine

Placeholder Content Image

Relax with a calypso mango curd ice cream sundae

<p>Perfect for a cheat weekend, this ice cream sundae pairs perfectly with the tropical taste of mango!</p> <p><strong>Ingredients</strong></p> <ul> <li>3 Calypso mangoes</li> <li>1 litre good-quality vanilla ice-cream</li> <li>½ x 250g packet butternut snap biscuits</li> <li>½ cup pistachios</li> <li>½ cup shredded coconut, toasted</li> </ul> <p><strong>Calypso mango curd</strong></p> <ul> <li>1 Calypso mango</li> <li>6 egg yolks</li> <li>¾ cup caster sugar</li> <li>3 lemons, juiced</li> <li>125g butter, chilled, chopped</li> </ul> <p><strong>Directions</strong></p> <p>1. To make the curd, cut the cheeks from the mango. Using a large spoon remove the mango fruit from the cheeks. Puree mango until smooth. You need ¾ cup. Whisk egg yolks and sugar in a 6-cup capacity heatproof, microwave-safe bowl until combined. Whisk in ½ cup lemon juice. Add the butter. Microwave, uncovered, for 6-7 minutes on Medium/50%, whisking every minute, until the curd thickens and just comes to the boil. Stir in mango puree. Cover surface with plastic wrap. Refrigerate for 2 hours.</p> <p>2. Spoon the ice-cream into a large bowl. Stand at room temperature for 10 minutes, or until softened slightly. Fold in 1 cup of mango curd. Spoon into a 12cm x 22cm (base) loaf pan. Cover and freeze overnight.</p> <p>3. Process biscuits and pistachios until finely chopped. Stir in coconut. Cut the cheeks from the mangoes. Using a large spoon remove the mango fruit from the cheeks and cut into 2cm cubes.</p> <p>4. To serve, spoon half the biscuit mixture into the base of six serving glasses. Top with scoops of ice-cream and half the mango. Repeat layers. Serve.</p> <p><strong>Tips</strong></p> <p>Mango curd makes 2 cups; store the remaining mango curd in a jar in the fridge for up to one month.</p> <p>Try folding it through whipped cream and serving on top of pavlova or serve over scones, toasted waffles or toasted crumpets. </p> <p><em>Recipe courtesy of <a rel="noopener" href="http://calypsomango.com.au/" target="_blank">Calypso Mangoes</a>.</em></p> <p><em>Republished with permission of <a href="https://www.wyza.com.au/recipes/calypso-mango-curd-ice-cream-sundae.aspx">Wyza.com.au</a>.</em></p>

Food & Wine

Placeholder Content Image

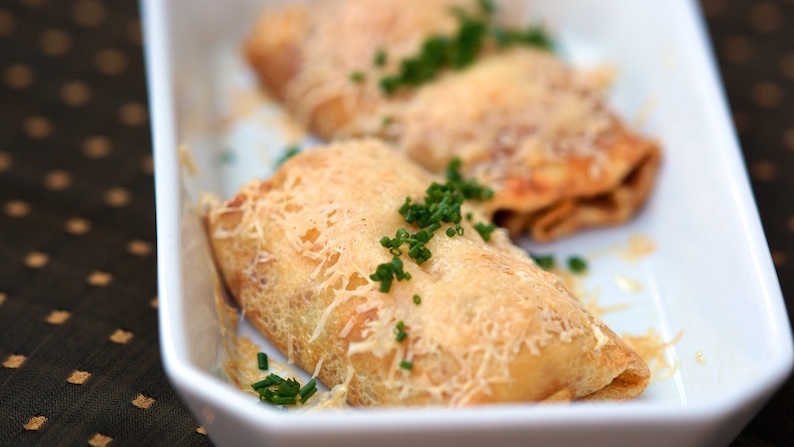
A must try! Lemony seafood crêpes

<p>Serve these creamy crêpes with a green salad as a light meal, or one per person as an enticing entrée. They can be filled with whatever seafood or any vegetables you have on hand.</p> <p><strong>Ingredients</strong></p> <ul> <li>50g butter</li> <li>1 small leek, washed well, white part only, chopped</li> <li>1 clove garlic, chopped</li> <li>400g green prawns, peeled, deveined, chopped</li> <li>200g piece salmon fillet, skin off, pin-boned, cut into bite-sized chunks</li> <li>1 lemon, juiced</li> <li>Salt flakes and freshly ground black pepper, to taste</li> <li>1 bunch chives, chopped</li> <li>120g gruyère cheese, grated</li> <li>Béchamel Sauce</li> <li>25g butter</li> <li>2 tablespoons plain flour</li> <li>300ml milk</li> <li>Pinch salt</li> <li>Pinch freshly grated nutmeg</li> </ul> <p><strong>Crêpes</strong></p> <ul> <li>¾ cup plain flour</li> <li>Pinch salt</li> <li>1¼ cups milk</li> <li>3 eggs</li> <li>40g butter, melted</li> </ul> <p><strong>Directions</strong></p> <p><strong>Make Crêpes </strong></p> <p>1. Sift flour into a bowl, add salt and make a well in the centre. Combine milk and eggs and slowly pour into the well, whisking to incorporate the flour; stop whisking as soon as all flour is incorporated and batter is smooth. </p> <p>2. Stir in butter and strain into a jug.</p> <p>3. Heat a heavy-based frying pan over a medium heat and grease with very little butter. Pour in just enough batter to coat the pan, swirling quickly to cover the base evenly. Cook for about 30 seconds, until the edges begin to curl and the base is golden brown. Loosen the edges then turn the crêpe with fingers or an egg lift and cook for another 20 seconds or so until golden and dry. </p> <p>4. Slide out of the pan onto a clean cloth. Repeat with remaining batter, stacking cooked crêpes on top of one another.</p> <p><strong>Make Béchamel Sauce</strong></p> <p>1. Melt butter in a saucepan, stir in flour and cook for about 4 minutes over a low heat until mixture crumbles and comes together. Gradually add milk, stirring continuously with a wooden spoon. Add salt and nutmeg and stir until sauce comes to the boil. Remove from heat.</p> <p>2. Pre-heat oven to 180°C.</p> <p>3. Melt butter, add leeks, garlic and salt and cook over a low heat, covered, for about 5 minutes, until soft. Increase heat to medium, push leek mixture to 1 side of the pan, add prawns and salmon, and cook for 3-4 minutes, turning to colour all sides. Remove from heat. Stir in Béchamel Sauce, lemon juice, salt, pepper, chives and a third of the cheese.</p> <p>4. Place 1 heaped tablespoon of the mixture in the centre of a crêpe, fold in sides to partially enclose then tuck other ends under to form a parcel. Place in a greased baking dish, seam-side down. Repeat with remaining crêpes, forming a single layer. Sprinkle remaining gruyère over the top and bake for 15-20 minutes until filling is heated through and cheese is lightly browned.</p> <p><strong>Tips</strong></p> <p>Alternative species: Blue-eye trevalla, bugs, crabmeat, ling, marron, redclaw, yabby. </p> <p><em>Republished with permission of <a href="https://www.wyza.com.au/recipes/lemony-seafood-cr%C3%AApes.aspx">Wyza.com.au.</a></em></p>

Food & Wine

Placeholder Content Image

Mouth-watering Moroccan lamb with lemon spinach

<p>Are you interested in what going gluten free tastes like? Or do you have issues with IBS? Either way we have you covered with this hearty lamb dinner which will have them asking for seconds!</p> <p>Recipes and images from THE Two-Step Low-FODMAP DIET and Recipe Book by Dr Sue Shepherd (Pan Macmillan, RRP $39.95).</p> <p><strong>Ingredients</strong></p> <ul> <li>Moroccan lamb</li> <li>2 teaspoons ground cumin</li> <li>2 teaspoons ground coriander</li> <li>1⁄2 teaspoon ground ginger</li> <li>1 teaspoon sweet paprika</li> <li>1⁄4 teaspoon cayenne pepper</li> <li>1⁄2 teaspoon ground cinnamon</li> <li>1⁄4 teaspoon salt</li> <li>4 large lamb leg steaks, approx. 180 g each</li> <li>60 mL (1⁄4 cup) garlic-infused olive oil</li> <li>1 × 425 g can crushed tomatoes</li> <li>250 mL (1 cup) gluten-free, onion-free beef stock</li> <li>Lemon spinach</li> <li>60 mL (1⁄4 cup) lemon-infused olive oil</li> <li>100 g baby spinach leaves (or baby kale leaves if desired)</li> <li>salt and freshly ground black pepper</li> </ul> <p><strong>Method</strong></p> <p>1. Combine all the spices in a plastic bag. Brush the lamb steaks with 1 tablespoon of the olive oil and place in the bag.</p> <p>2. Toss in the spice mix to ensure an even coating.</p> <p>3. Refrigerate for 2 hours if possible (the lamb will still be tasty if this is not done).</p> <p>4. Heat the remaining olive oil in a large non-stick frying pan over a medium–high heat. Sear the lamb for 1–2 minutes on each side.</p> <p>5. Add the tomatoes to the pan with the stock. Lower the heat and simmer for 30–40 minutes, slightly covered, or until the lamb is tender and the sauce thickens.</p> <p><strong>To make the lemon spinach</strong></p> <p>1. Heat the olive oil in a saucepan, add the spinach and toss through until the spinach just wilts.</p> <p>2. Season to taste, and serve with the lamb.</p> <p><em>Republished with permission of <a href="https://www.wyza.com.au/recipes/moroccan-lamb-with-lemon-spinach.aspx">Wyza.com.au.</a></em></p>

Food & Wine

Placeholder Content Image

Miso-grilled baby chicken with lemon garlic chilli dipper

<p>So here we have some baby chicken, or, as the French call it, poussin. Quite possibly a far better name; after all, eating the ‘baby’ of something isn’t always such an appealing idea. It does, however, help to describe it on a menu.</p> <p>I use baby chicken for this because not only does the skin caramelise very quickly but the flesh cooks through before the skin starts to burn – perfect for a robata grill or your home barbecue.</p> <p><strong>Ingredients</strong></p> <p>2 baby chickens, aka poussins</p> <p><strong>Marinade</strong></p> <p>100ml den miso (find out how to make it<span> </span><a rel="noopener" href="http://www.marthastewart.com/965458/nobus-den-miso" target="_blank"><span>here</span></a>)</p> <p>1–2 green chillies, chopped (quantity depends on how much you can handle)</p> <p><strong>Lemon-garlic-chilli dipper</strong></p> <p>100ml sake</p> <p>2 tablespoons dark soy sauce</p> <p>1 scorcher of a red chilli, finely chopped</p> <p>2 teaspoons green Tabasco sauce</p> <p>2 teaspoons fresh garlic purée</p> <p>2 teaspoons yuzu juice</p> <p>2 tablespoons lemon juice</p> <p>2 tablespoons olive oil</p> <p><strong>Daikon salad</strong></p> <p>100g daikon</p> <p>50g carrot</p> <p>50g cucumber</p> <p>5 or 6 mint leaves</p> <p>10 coriander leaves, with a bit of stem left on</p> <p>10ml yuzu juice</p> <p>a few drops of dark soy sauce</p> <p>a few drops of extra virgin olive oil</p> <p><strong>Directions</strong></p> <p>1. Make the marinade by mixing the den miso and the chillies together. Use a sharp knife to cut each poussin clean in half and make a couple of score marks, one into the fat part of the drumstick and the other into the thigh. Marinate in the miso-chilli marinade for at least 6 hours and up to 12 hours.</p> <p>2. To make the dipper, whisk all the ingredients, except the oil. Slowly whisk in the oil until emulsified.</p> <p>3. To make the salad, thinly slice the daikon on a Japanese mandoline and layer the slices in piles of 5 or 6 and, using a knife, shred very thinly. Do the same with the carrot and cucumber and mix together. Add the mint and coriander leaves and drizzle with the yuzu, soy sauce and extra virgin olive oil.</p> <p>4. Set up your barbecue and get the charcoal super-hot – the flames start to die down a little, and the embers will be glowing – then put your poussins on the grill. If you’re concerned about the poussins not being cooked through enough and burning, take off the barbecue and finish cooking in a hot oven, about 180°C, for 8–10 minutes. To test the chicken to see if it’s fully cooked, insert a thin metal skewer or the sharp end of small knife into the thickest part of the thigh, pause for a couple of seconds, pull it and hold the skewer to your lip. Feel burning? It’s cooked through.</p> <p>5. Once cooked, serve it up as it is, or, if you want to get a little bit fancier, chop it up into smaller pieces. We serve this in the restaurant with the shredded daikon salad on the side, which is a nice and refreshing contrast to the miso and chilli.</p> <p><strong>Tips</strong></p> <p>This marinade is extremely versatile: use it for salmon belly, scallops, steaks, even tofu. It is also a very good sauce base: just add some mustard and vinegar and serve with sashimi or caramelised onions and it will be your lamb chop’s best mate.</p> <p><em>This is an edited extract from<span> </span><a rel="noopener" href="http://t.dgm-au.com/c/185116/69171/1880?u=http%3A%2F%2Fwww.booktopia.com.au%2Fjunk-food-japan-scott-hallsworth%2Fprod9781472919922.html" target="_blank"><span>Junk Food Japan</span></a><span> </span>by Scott Hallsworth, Bloomsbury Publishing, RRP $52.99. Photography © David Loftus.</em></p> <p><em>Written by Wyza. Republished with permission of <a href="https://www.wyza.com.au/recipes/miso-grilled-baby-chicken.aspx">Wyza.com.au.</a></em></p>

Food & Wine

Placeholder Content Image

Lemon baked salmon with asparagus

<p>Summer is all about fresh, tasty seafood, and this lemon-baked salmon with asparagus is the ultimate dish for a warm summer’s night.</p> <p><strong><span style="text-decoration: underline;">Serves:</span> </strong>2 (one fillet each!)</p> <p><strong><span style="text-decoration: underline;">Ingredients:</span></strong></p> <ul> <li>2 salmon fillets, skin on</li> <li>1 lemon, juiced</li> <li>2 rosemary stalks, leaves taken off the stalk and chopped</li> <li>1 garlic clove, sliced into slivers</li> <li>6 asparagus spears, trimmed</li> <li>6 cherry tomatoes, whole</li> <li>2 tbsp. Olive oil</li> <li>Salt and pepper, to taste</li> </ul> <p><strong><span style="text-decoration: underline;">Method:</span></strong></p> <ol start="1"> <li>Pre-heat oven to 180˚C</li> <li>Add lemon juice, rosemary, garlic, olive oil, salt and pepper into a bowl and mix.</li> <li> In a large mixing bowl, add the salmon fillets and the lemon mixture. Coat the fish evenly.</li> <li>Leave to marinate for 1 hour prior to cooking.</li> <li>On two separate sheets of foil or baking paper, lay the fish skin down and top with cherry tomatoes and 3 asparagus stalks on each.</li> <li>Wrap each fillet individually covering it completely to ensure no air escapes.</li> <li> Place into the oven for 15 minutes or until cooked to your liking.</li> <li>Serve with more asparagus and some salad!</li> </ol> <p><em>Recipe courtesy of Leah Itsines on behalf of <a href="http://www.asparagus.com.au/" target="_blank"><strong><span style="text-decoration: underline;">Australian Asparagus</span></strong></a>. </em></p>

Food & Wine

Placeholder Content Image

Sautéed potatoes with lemon and rosemary

<p>Rosemary, lemon, garlic and salt and pepper add plenty of flavour to this potato dish. And if that’s not enough, sautéing them will knock your socks off.</p> <p><strong><span style="text-decoration: underline;">Serves:</span></strong> 2</p> <p><strong><span style="text-decoration: underline;">Ingredients:</span></strong></p> <ul> <li>2 tablespoons olive oil25g of butter</li> <li>200g new potatoes, halved lengthways</li> <li>2 sprigs fresh rosemary</li> <li>2 garlic cloves, peeled, crushed</li> <li>1 lemon, juice only</li> <li>Sea salt</li> <li>Freshly ground black pepper</li> </ul> <p><strong><span style="text-decoration: underline;">Method:</span></strong></p> <p>1. Heat the oil and butter in a deep frying pan. Add the potatoes and fry for five to six minutes.</p> <p>2. Add the rosemary and garlic to the pan and continue to fry, turning occasionally, over a medium to high heat for a further five minutes, or until cooked through.</p> <p>3. Squeeze over the lemon juice and season with sea salt and freshly ground black pepper.</p> <p><strong>Related links:</strong></p> <p><em><strong><span style="text-decoration: underline;"><a href="/lifestyle/food-wine/2015/05/potato-cakes/">Potato cakes</a></span></strong></em></p> <p><em><strong><span style="text-decoration: underline;"><a href="/lifestyle/food-wine/2015/02/crispy-potato-roast/">Crispy potato roast</a></span></strong></em></p> <p><em><strong><span style="text-decoration: underline;"><a href="/lifestyle/food-wine/2014/11/cheesy-potato-bake-recipe/">Cheesy potato bake</a></span></strong></em></p>

Food & Wine

Placeholder Content Image

Butterflied lemon chicken

<p>Once you try Merv Hughes’ recipe for butterflied lemon chicken, you’ll never go back.</p> <p><strong><span style="text-decoration: underline;">Serves:</span></strong> 4</p> <p><strong><span style="text-decoration: underline;">Ingredients:</span></strong></p> <ul> <li>1.2 to 1.5 kg whole chicken, cut through the backbone</li> <li>2 tablespoons Worcestershire sauce</li> <li>Salt</li> <li>½ teaspoon cracked black pepper</li> <li>1 garlic clove, crushed</li> <li>Juice and zest of 1 lemon</li> <li>Olive oil, for cooking</li> </ul> <p><strong><span style="text-decoration: underline;">Method:</span></strong></p> <ol start="1"> <li>Put the chicken on a chopping board, breast side down, and using a pair of kitchen scissors, cut closely through each side of the backbone.</li> <li>Turn the chicken breast side up and open the chicken. Place your hand on top and flatten. Rub the chicken with the Worcestershire sauce, salt, pepper, garlic, lemon and olive oil.</li> <li>Place the chicken on the barbecue grill, breast side down, and cook over a medium-high heat for 15 to 20 minutes, depending on size. Turn and cook for a further 15 to 20 minutes.</li> </ol> <p><img width="146" height="161" src="https://oversixtydev.blob.core.windows.net/media/45169/bbq-beer-bs_146x161.jpg" alt="BBQ BEER BS" style="float: right;"/></p> <p>BBQ Beer &amp; B.S.<em>, New Holland Publishers RRP $40.00 available from all good bookstores or online <span style="text-decoration: underline;"><strong><a href="http://www.newhollandpublishers.com/" target="_blank">www.newhollandpublishers.com</a></strong></span></em></p>

Food & Wine

Placeholder Content Image

10 unusual uses for lemons

<p>Not just for salad dressings and drinks, lemons have so many other uses around the house that you may not know about.</p> <p><strong>1. Freshen up the fridge</strong></p> <p>Squeeze fresh lemon juice onto a clean sponge and place in the fridge overnight. It will soak up any bad odours and leave a fresh citrus scent behind.</p> <p><strong>2. Cleaning the chopping board</strong></p> <p>Cut a lemon in half and use the cut side to rub all over a clean chopping board. It will soak up the smell of foods like meat, onion or fish. Then just wash as normal.</p> <p><strong>3. Deodorising the garbage disposal</strong></p> <p>These can get a little funky so just pop two halves of a lemon down there and give it a few seconds of pulsing. Then leave overnight and turn on in the morning. Wash down with some warm water for a fresh smelling pipe.</p> <p><strong>4. Remove deodorant marks</strong></p> <p>If your work shirts have yellowed under the arms, you can scrub them with equal parts lemon juice and water to remove the stains.</p> <p><strong>5. Freshen the air</strong></p> <p>If you’ve got a lingering smell in the house such as burnt toast, boil up some sliced lemon in a pan of water for half an hour.</p> <p><strong>6. Prevent sticky rice</strong></p> <p>Prevent rice sticking together by squeezing a tablespoon of lemon juice into the cooking water.</p> <p><strong>7. Removing cooking smells from hands</strong></p> <p>If you’ve been chopping garlic or onion and your hands are a bit whiffy, simply rub some just-cut lemon over the area. Wash and dry as normal.</p> <p><strong>8. Deterring pests</strong></p> <p>If you’ve got more than your fair share of cockroaches or spiders, try leaving lemon peel on your window sills and other entrances. The insects don’t like it and will avoid the area.</p> <p><strong>9. Spruce up the dishwasher</strong></p> <p>Place half a lemon in the top rack of the dishwasher along with your usual load. It will deodorise and freshen up the dishwasher without harsh chemicals.</p> <p><strong>10. Soak dirty fingernails</strong></p> <p>If you’ve been gardening or painting, make a nail bath of warm water with the juice of a lemon. Soak your fingers for 5-10 minutes, then rub the cut side of the other lemon half over the nail.</p> <p>Have we missed anything? What else do you use lemons for around the house? We would love to hear from you in the comments.</p>

Home & Garden

Placeholder Content Image

Greek chicken, lemon and rice soup

<p>This Greek soup will soon become a favourite winter-dish as it not only tastes delicious and warms you up but will also fill you up.</p> <p><strong><span style="text-decoration: underline;">Serves:</span></strong> Two</p> <p><strong><span style="text-decoration: underline;">Ingredients: </span></strong></p> <ul> <li>½ cup packet Jasmine rice</li> <li>1 cube chicken stock</li> <li>1 litre boiling water</li> <li>1 clove garlic</li> <li>1 lemon</li> <li>2 fillets chicken breast (350g)</li> <li>2 eggs</li> <li>70g bag baby spinach leaves</li> <li>3 sprigs mint, leaves picked</li> </ul> <p><strong><span style="text-decoration: underline;">Method:</span></strong></p> <p>1. To prepare the ingredients, place the Jasmine rice in a sieve and rinse really well until the water runs clear. Crumble the chicken stock, peel and crush the garlic, and zest and juice the lemon. Dice the chicken breast and finely slice the mint leaves. Lightly beat the eggs.<br /> <br /> 2. Place the chicken stock cube, boiling water, garlic, lemon zest and juice in a medium saucepan over a medium heat. Bring to the boil. Add the Jasmine rice and simmer for 8 minutes, or until the rice is just tender. Add the chicken breast and cook, stirring occasionally, for 3-4 minutes or until the chicken is cooked through.<br /> <br /> 3. Lightly beat the eggs in a heatproof jug or bowl. Add 1⁄2 cup hot stock mixture from the saucepan to the egg, whisking to combine. Remove the saucepan from the heat then slowly add the whisked egg mixture to the saucepan in a steady stream, stirring until well combined. Place the saucepan back over a low heat and stir through the baby spinach until wilted. Season to taste with salt and pepper.<br /> <br /> 4. To serve, ladle the soup into bowls and top with the fresh mint.</p> <p><em>Recipe courtesy of <a href="https://www.hellofresh.com.au/tasty/" target="_blank"><strong><span style="text-decoration: underline;">Hello Fresh</span></strong></a>. </em></p> <p><em><strong>Have you ordered your copy of the Over60 cookbook, The Way Mum Made It, yet? Featuring 175 delicious tried-and-true recipes from you, the Over60 community, and your favourites that have appeared on the Over60 website, <a href="https://shop.abc.net.au/products/way-mum-made-it-pbk" target="_blank"><span style="text-decoration: underline;">head to the abcshop.com.au to order your copy now</span></a>.</strong></em></p>

Food & Wine